An allow list enables organizations to streamline the processing of defined scripts, IP’s, domains or applications, effectively bypassing many of the predefined rules on the agent. While not mandatory, it can reduce the number of false positives in situations where the object in question deviates from best practices and may otherwise get flagged as a threat.
Defining an allow rule
Allow rules exist at several levels within the enterprise console. They can exist at the platform, and group level, from Settings > Windows etc., as well as at the global level, under Settings > Global. Regardless of where they are defined, adding new entries follows the same process, albeit with a different scope.
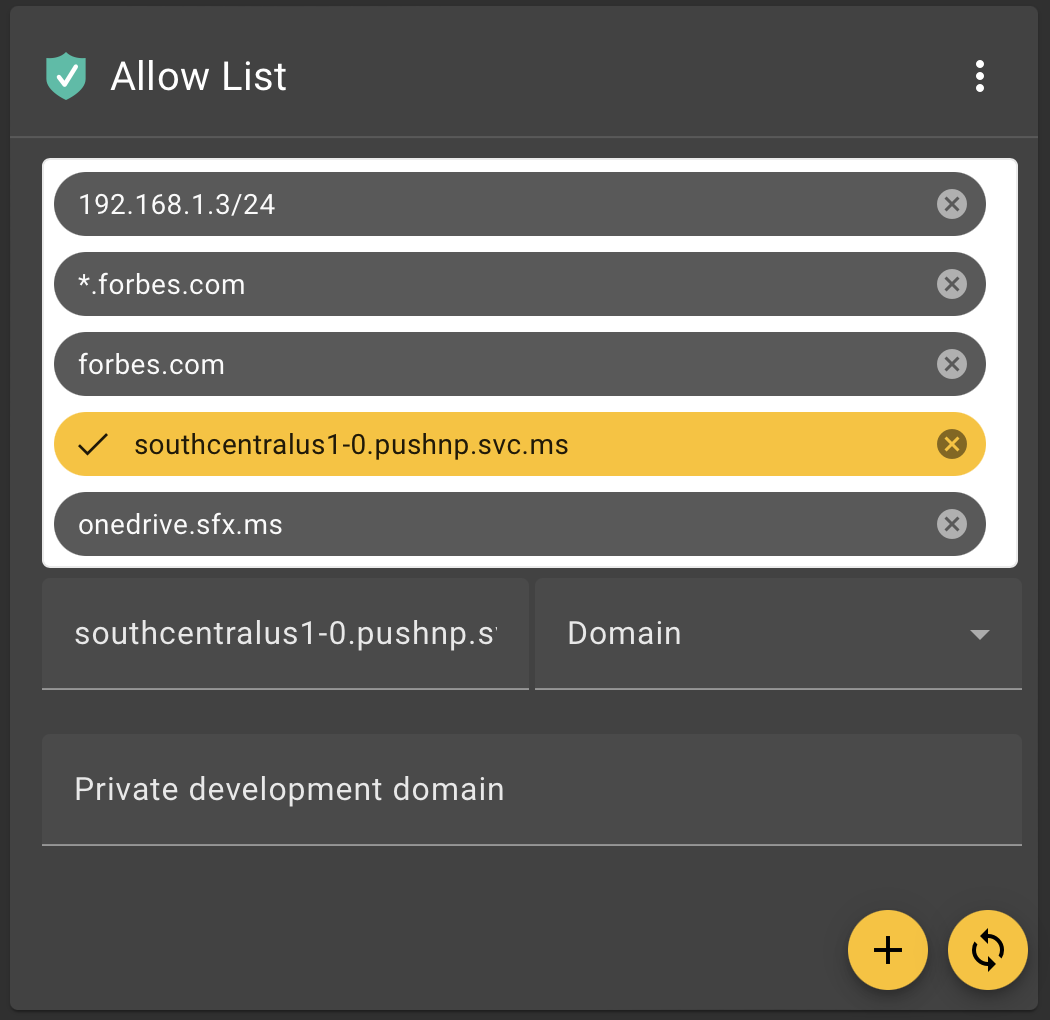
The allow list presents a standardized interface for adding domains and IP addresses as shown below. This consists of a list of existing “allowed” entries, and 3 fields where you can specify the domain or IP, the type, and description of the allow rule.

In the lower right corner are the plus “+” and sync “↺” buttons. The plus is used to add new values to the list and the sync is used when you wish to update existing values. To edit an existing value you can use your mouse to select a row in the list, and it will become highlighted in yellow, as shown above. If the text in any of the 3 fields is changed the sync button can be used to push the values back into the list. Note however, that this will not commit the changes to the settings, UNTIL, you click the save button on the setting, using the checkmark icon in the lower right corner of the page.
Rule parameters
When defining a rule there is only one “Type” current available called domain. This will be expanded over coming releases. It accepts both IP addresses as well as domains and even “executable” files on Windows. On Android there is an additional option called “Android App” where you can define the complete dot based application name.
IP Addresses
When defining an IP address it is important use the complete IPv4 octet or IPv6 name. No spaces are accepted in either format. When defining an IPv4 address you may also use subnet masking. For example, if you wish to block more than one IP address, you could for example put in “32.24.63.1/24”. This would ALLOW all addresses in the range of 32.24.63.0 to 32.24.63.255 inclusive. Otherwise, specify individual addresses without the trailing slash.
Domains
When allowing domains you can specify entire or partial domains using wildcard characters. For example, to allow access from a fictitious site called “news.com”, you would enter “news.com” as the allow name. This would allow traffic specifically from “news.com” and all URI’s (Uniform Resource Identifiers) encompassed in that domain, such as “news.com/article-about-something”. It would NOT automatically allow phishing from “subdomain.news.com” or any URI from that subdomain.
Wildcards maybe used to define more precisely, domains and subdomains for allow listing. As in the sample above you could use the asterisk “*” or star symbol to specify a number of matches on the domain itself. These can be quite powerful.
For example if you wanted to allow all subdomains of a domain you could use the following syntax:
“*.domain.com”
This would automatically allow “www.news.com” and “my.news.com” etc. It would NOT however allow “news.com”, for that, you would need to specify that as an individual allow rule. You may get even more sophisticated by using wildcards within the body of the domain itself. As an example you may use “www.appl*.com”. This would automatically allow “www.apple.com” AND “www.application.com” and any other variant you can imagine starting with “www.appl” and ending in “.com”.
While this can be a very powerful tool, it can also be quite dangerous, and overly permissive. We always recommend using the concept of least privilege when designing these rules.
